Simple Engineering

TestingNodejsApplications

It is quite a challenge to add good looking code snippets documentations, presentations or books.

When adding code in documentation, the classic move is to take a screenshot, use tool X to add extra pictogram to the code, and upload a picture and hope for the best that there is no bug in our example. To solve the versioning issue, some copy/paste from gist to content, just to avoid penalty that comes with using iframes. Both approaches are not sustainable in terms of workflow.

This article will explore scalable, sane ways to share good looking code snippets, with possibility to edit shared code, without fear or hustle of keeping track of all places the code has been shared.

In this article you will learn about:

  • Tools available to make good code snippets to add in various presentation media
  • Techniques to leverage tools without breaking the piggy bank

Even though this blogpost was designed to offer complementary materials to those who bought my Testing nodejs Applications book, the content can help any software developer to tuneup working environment. You use this link to buy the book. Testing Nodejs Applications Book Cover

Using screenshots. Screenshots are the most obvious and ubiquitous form of code snippets sharing mechanism. The image produced by the snippets can easily be embedded in any form of medium, be a social media post, blog post, presentation or even a book. However, when time comes to add an addition to the code, or correct an error, then the scalability/sustainability of this practice manifest. It is not effective just to snap another print-screen and re-share everywhere else the print screen has been shared. Moreover, the code hardly looks good inside the editor. Developers editors are most of the time optimized for work, and not for presentations.

Using carbon. Carbon is really powerful tool. It made it possible to add, edit and share quite stunning representation of code, as pictures/svg. It allows to format code at taste of the author, and makes the code easily shareable as svg or image elements. Since the platform that generate the code is hosted on somebody else's servers, it becomes quite a challenge to keep track of all code change in every shared snippet.

Using gist. Gist allows to host/track, edit and share code snippets with the world. To share the code within blogposts and heavy presentations comes with a downside: gist uses inline iframe, which sometimes do not look good on mobile, but also are really a pain in ass performance-wise.

There are solutions for sharing the code snippets around the internet. Some of those resources do not allow their users to such as using gist(this looks good)

Synopsis

Quite often code snippets are posted on this and other dev platforms. Graphical annotations(drawings and text) on top of snippets, make code easy to digest, therefore conveying more knowledge to readers.

Hopes

Codepen.io gives a way to take and export a screenshot. There is also highlighter libraries like highlight.js, in additions to plugins that allow highlighting in presentation(text processors).

Examples

teropa article 
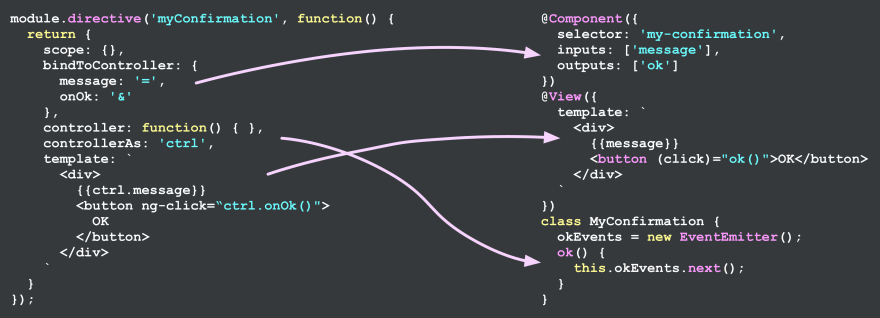
this gem comes from “refactoring angular apps”

Problem

From previous examples, and statements, one may ask “How do people add graphical annotations on code snippets?”. In case of an error in code sample, we tend to go back and fix the example. This forces authors to go back and edit graphical annotations, before updating the documentation with the right snippets. Is it possible to reduce time it takes to make such modifications.

Tools

Non exhaustive list of some products:

Non exhaustive list of some presentation software, other than Keynote, Google Slides and Microsoft PowerPoint(If this is still a thing)

References

I read most of these links without luck.

Related Community Questions

#snippets #CodeAnnotations #carbon #codepen #pens #jsfiddle #fiddles #HowTo #TestingNodejsApplications

This article revisits essentials on how to install upstart an event based daemon for starting/stopping tasks on development and production servers.

This article has complementary materials to the Testing nodejs Applications book. However, the article is designed to help both those who already bought the book, as well as the wide audience of software developers to setup working environment. Testing Nodejs Applications Book Cover You can grab a copy of this book on this link

There are a plethora of task execution solutions, for instance systemd and init, rather complex to work with. That makes upstart a good alternative to such tools.

In this article you will learn about:

  • Tools available for task execution
  • How to install upstart task execution
  • How to write basic upstart task

Installing upstart on Linux

It is always a good idea to update the system before start working. There is no exception, even when a daily task updates automatically binaries. That can be achieved on Ubuntu and Aptitude enabled systems as following:

$ apt-get update # Fetch list of available updates
$ apt-get upgrade # Upgrades current packages
$ apt-get dist-upgrade # Installs only new updates

Example: updating aptitude binaries

At this point most of packages should be installed or upgraded. Except Packages whose PPA have been removed or not available in the registry. Installing software can be done by installing binaries, or using Ubuntu package manager.

Installing a upstart on Linux using apt

Installing upstart on macOS

upstart is a utility designed mainly for Linux systems. However, macOS has its equivalent, launchctl designed to stop/stop processes prior/after the system restarts.

Installing upstart on a Windows machine

Whereas macOS systems and Linux are quite relax when it comes to working with system processes, Windows is a beast on its own way. upstart was built for *nix systems but there is no equivalent on Windows systems: Service Control Manager. It basically has the same ability to check and restart processes that are failing.

Automated upgrades

Before we dive into automatic upgrades, we should consider nuances associated to managing a mongodb instance. The updates fall into two major, quite interesting, categories: patch updates and version upgrades.

Following the SemVer ~ aka Semantic Versioning standard, it is recommended that the only pair minor versions be considered for version upgrades. This is because minor versions, as well as major versions, are subject to introducing breaking changes or incompatibility between two versions. On the other hand, patches do not introduce breaking changes. Those can therefore be automated.

In case of a critical infrastructure piece of processes state management calibre, we expect breaking changes when a new version introduces a configuration setting is added, or dropped between two successive versions. Upstart provides backward compatibility, so chances for breaking changes between two minor versions is really minimal.

We should highlight that it is always better to upgrade at deployment time. The process is even easier in containerized context. We should also automate only patches, to avoid to miss security patches.

In the context of Linux, we will use the unattended-upgrades package to do the work.

$ apt-get install unattended-upgrades apticron

Example: install unattended-upgrades

Two things to fine-tune to make this solution work are: to enable a blacklist of packages we do not to automatically update, and two, to enable particular packages we would love to update on a periodical basis. That is compiled in the following shell scripts.

Unattended-Upgrade::Allowed-Origins {
//  "${distro_id}:${distro_codename}";
    "${distro_id}:${distro_codename}-security"; # upgrading security patches only 
//   "${distro_id}:${distro_codename}-updates";  
//  "${distro_id}:${distro_codename}-proposed";
//  "${distro_id}:${distro_codename}-backports";
};

Unattended-Upgrade::Package-Blacklist {
    "vim";
};

Example: fine-tune the blacklist and whitelist in /etc/apt/apt.conf.d/50unattended-upgrades

The next step is necessary to make sure unattended-upgrades download, install and cleanups tasks have a default period: once, twice a day or a week.

APT::Periodic::Update-Package-Lists "1";            # Updates package list once a day
APT::Periodic::Download-Upgradeable-Packages "1";   # download upgrade candidates once a day
APT::Periodic::AutocleanInterval "7";               # clean week worth of unused packages once a week
APT::Periodic::Unattended-Upgrade "1";              # install downloaded packages once a day

Example: tuning the tasks parameter /etc/apt/apt.conf.d/20auto-upgrades

This approach works on Linux(Ubuntu), especially deployed in production, but not Windows nor macOS. The last issue, is to be able to report problems when an update fails, so that a human can intervene whenever possible. That is where the second tool apticron in first paragraph intervenes. To make it work, we will specify which email to send messages to, and that will be all.

EMAIL="<email>@<host.tld>"

Example: tuning reporting tasks email parameter /etc/apticron/apticron.conf

Conclusion

In this article we revisited ways to install upstart on various platforms. Even though configuration was beyond the scope of this article, we managed to get everyday quick refreshers out.

References

#nodejs #homebrew #UnattendedUpgrades #nginx #y2020 #Jan2020 #HowTo #ConfiguringNodejsApplications #tdd #TestingNodejsApplications

This article revisits essentials on how to install monit monitoring system on production servers.

This article has complementary materials to the Testing nodejs Applications book. However, the article is designed to help both those who already bought the book, as well as the wide audience of software developers to setup working environment. Testing Nodejs Applications Book Cover You can grab a copy of this book on this link

There are a plethora of monitoring and logging solutions around the internet. This article will not focus on any of those, rather provide alternatives using tools already available in Linux/UNIX environments, that may achieve near same capabilities as any of those solutions.

In this article you will learn about:

  • Difference between logging and monitoring
  • Tools available for logging
  • Tools available for monitoring
  • How to install monitoring and logging tools
  • How to connect end-to-end reporting for faster response times.

Installing monit on Linux

It is always a good idea to update the system before start working. There is no exception, even when a daily task updates automatically binaries. That can be achieved on Ubuntu and Aptitude enabled systems as following:

$ apt-get update # Fetch list of available updates
$ apt-get upgrade # Upgrades current packages
$ apt-get dist-upgrade # Installs only new updates

Example: updating aptitude binaries

At this point most of packages should be installed or upgraded. Except Packages whose PPA have been removed or not available in the registry. Installing software can be done by installing binaries, or using Ubuntu package manager.

Installing a monit on Linux using apt

Installing monit on macOS

In case homebrew is not already available on your mac, this is how to get one up and running. On its own, homebrew depends on ruby runtime to be available.

homebrew is a package manager and software installation tool that makes most developer tools installation a breeze.

$ /usr/bin/ruby -e "$(curl -fsSL https://raw.githubusercontent.com/Homebrew/install/master/install)"

Example: installation instruction as provided by brew.sh

Generally speaking, this is how to install/uninstall things with brew

$ brew install wget 
$ brew uninstall wget 

Example: installing/uninstalling wget binaries using homebrew

We have to to stress on the fact that Homebrew installs packages to their own directory and then symlinks their files into /usr/local.

It is always a good idea to update the system before start working. And that, even when we have a daily task that automatically updates the system for us. macOS can use homebrew package manager on maintenance matters. To update/upgrade or check outdated packages, following commands would help.

$ brew outdated                   # lists all outdated packages
$ brew cleanup -n                 # visualize the list of things are going to be cleaned up.

$ brew upgrade                    # Upgrades all things on the system
$ brew update                     # Updates all outdated + brew itself
$ brew update <formula>           # Updates one formula

$ brew install <formula@version>    # Installs <formula> at a particular version.
$ brew tap <formular@version>/brew  # Installs <formular> from third party repository

# untap/re-tap a repo when previous installation failed
$ brew untap <formular> && brew tap <formula>   
$ brew services start <formular>@<version>

Example: key commands to work with homebrew cli

For more informations, visit: Homebrew ~ FAQ.

Installing a monit on a macOS using homebrew

It is hard to deny the supremacy of monit on *NIX systems, and that doesn't exclude macOS systems. Installation of monit on macOS using homebrew aligns with homebrew installation guidelines. From above templates, the next example displays how easy it is to have monit up and running.

$ brew install monit        # Installation of latest monit
$ brew services start monit # Starting latest monit as a service 

Example: installing monit using homebrew

Installing monit on a Windows machine

Whereas macOS systems and Linux are quite relax when it comes to interacting with processes, Windows is a beast on its own way. monit was built for *nix systems but there is no equivalent on Windows systems: Service Control Manager. It basically has the same ability to check and restart processes that are failing.

Automated upgrades

Following the SemVer ~ aka Semantic Versioning standard, it is not recommended to consider minor/major versions for automated upgrades. One of the reasons being that these versions are subject to introducing breaking changes or incompatibility between two versions. On the other hand, patches are less susceptible to introduce breaking changes, whence ideal candidates for automated upgrades. Another among other reasons, being that security fixes are released as patches to a minor version.

In case of a critical infrastructure piece that is monitoring, we expect breaking changes when a new version introduces a configuration setting is added, or dropped between two successive versions. Monit is a well thought software that provides backward compatibility, so chances for breaking changes between two minor versions is really minimal.

We should highlight that it is always better to upgrade at deployment time. The process is even easier in containerized context. We should also automate only patches, to avoid to miss security patches.

In the context of Linux, we will use the unattended-upgrades package to do the work.

$ apt-get install unattended-upgrades apticron

Example: install unattended-upgrades

Two things to fine-tune to make this solution work are: to enable a blacklist of packages we do not to automatically update, and two, to enable particular packages we would love to update on a periodical basis. That is compiled in the following shell scripts.

Unattended-Upgrade::Allowed-Origins {
//  "${distro_id}:${distro_codename}";
    "${distro_id}:${distro_codename}-security"; # upgrading security patches only 
//   "${distro_id}:${distro_codename}-updates";  
//  "${distro_id}:${distro_codename}-proposed";
//  "${distro_id}:${distro_codename}-backports";
};

Unattended-Upgrade::Package-Blacklist {
    "vim";
};

Example: fine-tune the blacklist and whitelist in /etc/apt/apt.conf.d/50unattended-upgrades

The next step is necessary to make sure unattended-upgrades download, install and cleanups tasks have a default period: once, twice a day or a week.

APT::Periodic::Update-Package-Lists "1";            # Updates package list once a day
APT::Periodic::Download-Upgradeable-Packages "1";   # download upgrade candidates once a day
APT::Periodic::AutocleanInterval "7";               # clean week worth of unused packages once a week
APT::Periodic::Unattended-Upgrade "1";              # install downloaded packages once a day

Example: tuning the tasks parameter /etc/apt/apt.conf.d/20auto-upgrades

This approach works on Linux(Ubuntu), especially deployed in production, but not Windows nor macOS. The last issue, is to be able to report problems when an update fails, so that a human can intervene whenever possible. That is where the second tool apticron in first paragraph intervenes. To make it work, we will specify which email to send messages to, and that will be all.

EMAIL="<email>@<host.tld>"

Example: tuning reporting tasks email parameter /etc/apticron/apticron.conf

Conclusion

In this article we revisited ways to install monit on various platforms. Even though configuration was beyond the scope of this article, we managed to get everyday quick refreshers out.

Reading list and References

#nodejs #homebrew #UnattendedUpgrades #monit #y2020 ,#Jan2020 #HowTo #ConfiguringNodejsApplications #tdd #TestingNodejsApplications

This article revisits essentials on how to install nginx non blocking single threaded multipurpose web server on development and production servers.

This article has complementary materials to the Testing nodejs Applications book. However, the article is designed to help both those who already bought the book, as well as the wide audience of software developers to setup working environment. Testing Nodejs Applications Book Cover You can grab a copy of this book on this link

Installing nginx on Linux

It is always a good idea to update the system before start working. There is no exception, even when a daily task updates automatically binaries. That can be achieved on Ubuntu and Aptitude enabled systems as following:

$ apt-get update # Fetch list of available updates
$ apt-get upgrade # Upgrades current packages
$ apt-get dist-upgrade # Installs only new updates

Example: updating aptitude binaries

At this point most of packages should be installed or upgraded. Except Packages whose PPA have been removed or not available in the registry. Installing software can be done by installing binaries, or using Ubuntu package manager.

Installing a nginx on Linux using apt

Updating/Upgrading or first install of nginx server can be achieved with by the following commands.

$ sudo add-apt-repository ppa:nginx/stable
$ sudo apt-get update 
$ sudo apt-get install - nginx 

# To restart the service:
$ sudo service nginx restart 

Example: updating PPA and installing nginx binaries

Adding nginx PPA in first step is only required for first installs, on a system that does not have the PPA available in the system database.

Installing nginx on macOS

In case homebrew is not already available on your mac, this is how to get one up and running. On its own, homebrew depends on ruby runtime to be available.

homebrew is a package manager and software installation tool that makes most developer tools installation a breeze.

$ /usr/bin/ruby -e "$(curl -fsSL https://raw.githubusercontent.com/Homebrew/install/master/install)"

Example: installation instruction as provided by brew.sh

Generally speaking, this is how to install/uninstall things with brew

$ brew install wget 
$ brew uninstall wget 

Example: installing/uninstalling wget binaries using homebrew

We have to to stress on the fact that Homebrew installs packages to their own directory and then symlinks their files into /usr/local.

It is always a good idea to update the system before start working. And that, even when we have a daily task that automatically updates the system for us. macOS can use homebrew package manager on maintenance matters. To update/upgrade or check outdated packages, following commands would help.

$ brew outdated                   # lists all outdated packages
$ brew cleanup -n                 # visualize the list of things are going to be cleaned up.

$ brew upgrade                    # Upgrades all things on the system
$ brew update                     # Updates all outdated + brew itself
$ brew update <formula>           # Updates one formula

$ brew install <formula@version>    # Installs <formula> at a particular version.
$ brew tap <formular@version>/brew  # Installs <formular> from third party repository

# untap/re-tap a repo when previous installation failed
$ brew untap <formular> && brew tap <formula>   
$ brew services start <formular>@<version>

Example: key commands to work with homebrew cli

For more informations, visit: Homebrew ~ FAQ.

Installing a nginx on a Mac using homebrew

$ brew install nginx@1.17.8  # as in <formula>@<version>

Example: installing nginx using homebrew

Installing nginx on a Windows machine

MacOs comes with Python and Ruby already enabled, these two languages are somehow required to run successfully a nodejs environment on a Mac. This is an easy target as nginx gives windows binaries that we can download and install on a couple of clicks.

Automated upgrades

Before we dive into automatic upgrades, we should consider nuances associated to managing an nginx deployment. The updates fall into two major, quite interesting, categories: patch updates and version upgrades.

Following the SemVer ~ aka Semantic Versioning standard, it is not recommended to consider minor/major versions for automated upgrades. One of the reasons being that these versions are subject to introducing breaking changes or incompatibility between two versions. On the other hand, patches are less susceptible to introduce breaking changes, whence ideal candidates for automated upgrades. Another among other reasons, being that security fixes are released as patches to a minor version.

In case of a WebServer, breaking changes may be introduced when a critical configuration setting is added, or dropped between two successive versions.

We should highlight that it is always better to upgrade at deployment time. The process is even easier in containerized context. We should also automate only patches, to avoid to miss security patches.

In the context of Linux, we will use the unattended-upgrades package to do the work.

$ apt-get install unattended-upgrades apticron

Example: install unattended-upgrades

Two things to fine-tune to make this solution work are: to enable a blacklist of packages we do not to automatically update, and two, to enable particular packages we would love to update on a periodical basis. That is compiled in the following shell scripts.

Unattended-Upgrade::Allowed-Origins {
//  "${distro_id}:${distro_codename}";
    "${distro_id}:${distro_codename}-security"; # upgrading security patches only 
//   "${distro_id}:${distro_codename}-updates";  
//  "${distro_id}:${distro_codename}-proposed";
//  "${distro_id}:${distro_codename}-backports";
};

Unattended-Upgrade::Package-Blacklist {
    "vim";
};

Example: fine-tune the blacklist and whitelist in /etc/apt/apt.conf.d/50unattended-upgrades

The next step is necessary to make sure unattended-upgrades download, install and cleanups tasks have a default period: once, twice a day or a week.

APT::Periodic::Update-Package-Lists "1";            # Updates package list once a day
APT::Periodic::Download-Upgradeable-Packages "1";   # download upgrade candidates once a day
APT::Periodic::AutocleanInterval "7";               # clean week worth of unused packages once a week
APT::Periodic::Unattended-Upgrade "1";              # install downloaded packages once a day

Example: tuning the tasks parameter /etc/apt/apt.conf.d/20auto-upgrades

This approach works on Linux(Ubuntu), especially deployed in production, but not Windows nor macOS. The last issue, is to be able to report problems when an update fails, so that a human can intervene whenever possible. That is where the second tool apticron in first paragraph intervenes. To make it work, we will specify which email to send messages to, and that will be all.

EMAIL="<email>@<host.tld>"

Example: tuning reporting tasks email parameter /etc/apticron/apticron.conf

Conclusion

In this article we revisited ways to install nginx on various platforms. Even though configuration was beyond the scope of this article, we managed to get everyday quick refreshers out.

Reading list

#nodejs #homebrew #UnattendedUpgrades #nginx #y2020 #Jan2020 #HowTo #ConfiguringNodejsApplications #tdd #TestingNodejsApplications

This article revisits essentials on how to install mongodb, one of leading noSQL databases on development and production servers.

This article has complementary materials to the Testing nodejs Applications book. However, the article is designed to help those who bought the book to setup their working environment, as well as the wide audience of software developers who need same information.

In this article we will talk about:

__

  • How to install mongodb on Linux, macOS and Windows.
  • How to stop/start automatically prior/after system restarts

We will not talk about:

__

  • How to configure mongodb for development and production, as that is subject of another article worth visiting.
  • How to manage mongodb in a production environment, either in a containerized or standalone contexts.
  • How to load mongodb on Docker and Kubernetes

Installing mongodb on Linux

It is always a good idea to update the system before start working. There is no exception, even when a daily task updates automatically binaries. That can be achieved on Ubuntu and Aptitude enabled systems as following:

$ apt-get update        # Fetch list of available updates
$ apt-get upgrade       # Upgrades current packages
$ apt-get dist-upgrade  # Installs only new updates

Example: updating aptitude binaries

At this point most of packages should be installed or upgraded. Except Packages whose PPA have been removed or not available in the registry. Installing software can be done by installing binaries, or using Ubuntu package manager.

Installing a mongodb on Linux using apt

Updating/Upgrading or first time fresh install of mongodb can follow next scripts.

sudo may be skipped if the current user has permission to write and execute programs

# Add public key used by the aptitude for further updates
# gnupg should be available in the system
$ apt-get install gnupg 
$ wget -qO - https://www.mongodb.org/static/pgp/server-3.6.asc | sudo apt-key add - 

# create and add list for mongodb (version 3.6, but variations can differ from version to version, the same applies to architecture)
$ echo "deb [ arch=amd64 ] https://repo.mongodb.org/apt/ubuntu trusty/mongodb-org/3.6 multiverse" | sudo tee /etc/apt/sources.list.d/mongodb-org-3.6.list

# Updating libraries and make the actual install 
$ sudo apt-get update
$ sudo apt-get install -y mongodb-org

# To install specific version(3.6.17 in our example) of mongodb, the following command helps
$ sudo apt-get install -y mongodb-org=3.6.17 mongodb-org-server=3.6.17 mongodb-org-shell=3.6.17 mongodb-org-mongos=3.6.17 mongodb-org-tools=3.6.17

Example: adding mongodb PPA binaries and installing a particular binary version

It is always a good idea to upgrade often. Breaking changes happen on major/minor binary updates, but less likely on patch upgrades. The versions goes by pair numbers, so 3.2, 3.4, 3.6 etc. The transition that skips two version may be catastrophic. For example upgrades from any 3.x to 3.6, for this to work, there should be upgraded to an intermediate update from 3.x to 3.4, after which the update from 3.4 to 3.6 becomes possible.

# Part 1
$ apt-cache policy mongodb-org          # Checking installed MongoDB version 
$ apt-get install -y mongodb-org=3.4    # Installing 3.4 MongoDB version 

# Part 2   
# Running mongodb
$ sudo killall mongod && sleep 3 && sudo service mongod start
$ sudo service mongodb start           

# Part 3 
$ mongo                                 # Accessing to mongo CLI

# Compatible Mode
$ > db.adminCommand( { setFeatureCompatibilityVersion: "3.4" } )  
$ > exit

# Part 3 
$ sudo apt-get install -y mongodb-org=3.6   # Upgrading to latest 3.6 version 
# Restart Server + As in Part 2.

Example: updating mongodb binaries and upgrading to a version

Installing mongodb on macOS

In case homebrew is not already available on your mac, this is how to get one up and running. On its own, homebrew depends on ruby runtime to be available.

homebrew is a package manager and software installation tool that makes most developer tools installation a breeze. We should also highlight that homebrew requires xcode to be available on the system.

$ /usr/bin/ruby -e \
    "$(curl -fsSL https://raw.githubusercontent.com \
    /Homebrew/install/master/install)"

Example: installation instruction as provided by brew.sh

Generally speaking, this is how to install and uninstall things with brew

$ brew install wget 
$ brew uninstall wget 

Example: installing/uninstalling wget binaries using homebrew

We have to to stress on the fact that Homebrew installs packages to their own directory and then symlinks their files into /usr/local.

It is always a good idea to update the system before start working. And that, even when we have a daily task that automatically updates the system for us. macOS can use homebrew package manager on maintenance matters. To update/upgrade or check outdated packages, following commands would help.

$ brew outdated                   # lists all outdated packages
$ brew cleanup -n                 # visualize the list of things are going to be cleaned up.

$ brew upgrade                    # Upgrades all things on the system
$ brew update                     # Updates all outdated + brew itself
$ brew update <formula>           # Updates one formula

$ brew install <formula@version>    # Installs <formula> at a particular version.
$ brew tap <formular@version>/brew  # Installs <formular> from third party repository

# untap/re-tap a repo when previous installation failed
$ brew untap <formular> && brew tap <formula>   
$ brew services start <formular>@<version>

Example: key commands to work with homebrew cli

For more informations, visit: Homebrew ~ FAQ.

Installing a mongodb on a Mac using homebrew

$ brew tap mongodb/brew 
$ brew install mongodb-community@3.6
$ brew services start mongodb-community@3.6 # start mongodb as a mac service 

Example: Install and running mongodb as a macOS service

Caveats ~ We have extra steps to make in order to start/stop automatically when the system goes up/down. This step is vital when doing development on macOS , which does not necessarily needs Linux production bound task runners.

# To have launchd start mongodb at login:
$ ln -s /usr/local/opt/mongodb/*.plist ~/Library/LaunchAgents/

# Then to load mongodb now:
$ launchctl load -w ~/Library/LaunchAgents/homebrew.mxcl.mongodb.plist

# To unregister and stop the service, use the following command
$ launchctl unload -w ~/Library/LaunchAgents/homebrew.mxcl.mongodb.plist

# When not want/need launchctl this command works fine
$ mongod 

Example: Stop/Start when the system stops/starts

Installing mongodb on a Windows machine

Whereas MacOs, and most Linux distributions, come with Python and Ruby already enabled, It takes extra mile for Windows to make those two languages available. We have to stress on the fact that those two languages are somehow required to deploy a mongodb environment on most platforms, especially when working with nodejs.

The bright side of this story is that mongodb provides windows binaries that we can downloaded and installed in a couple of clicks.

Automated upgrades

Before we dive into automatic upgrades, we should consider nuances associated to managing a mongodb instance. The updates fall into two major, quite interesting, categories: patch updates and version upgrades.

Following the SemVer ~ aka Semantic Versioning standard, it is not recommended to consider minor/major versions for automated upgrades. One of the reasons being that these versions are subject to introducing breaking changes or incompatibility between two versions. On the other hand, patches are less susceptible to introduce breaking changes, whence ideal candidates for automated upgrades. Another among other reasons, being that security fixes are released as patches to a minor version.

We should highlight that it is always better to upgrade at deployment time. The process is even easier in containerized context. We should also automate only patches, to avoid to miss security patches.

In the context of Linux, we will use the unattended-upgrades package to do the work.

$ apt-get install unattended-upgrades apticron

Example: install unattended-upgrades

Two things to fine-tune to make this solution work are: to enable a blacklist of packages we do not to automatically update, and two, to enable particular packages we would love to update on a periodical basis. That is compiled in the following shell scripts.

Unattended-Upgrade::Allowed-Origins {
//  "${distro_id}:${distro_codename}";
    "${distro_id}:${distro_codename}-security"; # upgrading security patches only 
//   "${distro_id}:${distro_codename}-updates";  
//  "${distro_id}:${distro_codename}-proposed";
//  "${distro_id}:${distro_codename}-backports";
};

Unattended-Upgrade::Package-Blacklist {
    "vim";
};

Example: fine-tune the blacklist and whitelist in /etc/apt/apt.conf.d/50unattended-upgrades

The next step is necessary to make sure unattended-upgrades download, install and cleanups tasks have a default period: once, twice a day or a week.

APT::Periodic::Update-Package-Lists "1";            # Updates package list once a day
APT::Periodic::Download-Upgradeable-Packages "1";   # download upgrade candidates once a day
APT::Periodic::AutocleanInterval "7";               # clean week worth of unused packages once a week
APT::Periodic::Unattended-Upgrade "1";              # install downloaded packages once a day

Example: tuning the tasks parameter /etc/apt/apt.conf.d/20auto-upgrades

This approach works on Linux(Ubuntu), especially deployed in production, but not Windows nor macOS. The last issue, is to be able to report problems when an update fails, so that a human can intervene whenever possible. That is where the second tool apticron in first paragraph intervenes. To make it work, we will specify which email to send messages to, and that will be all.

EMAIL="<email>@<host.tld>"

Example: tuning reporting tasks email parameter /etc/apticron/apticron.conf

Conclusion

In this article we revisited ways to install mongodb on various platforms. Even though configuration was beyond the scope of this article, we managed to get everyday quick refreshers out in the article. There are areas we wish we added more coverage, probably not on the first version of this article.

Some of other places where people are wondering how to install mongodb on various platforms include, but not limited to Quora, StackOverflow and Reddit.

Reading list

#nodejs #homebrew #UnattendedUpgrades #mongodb #y2020 #Jan2020 #HowTo #ConfiguringNodejsApplications #tdd #TestingNodejsApplications

This article revisits essentials on how to install redis key/value data store on development and production servers.

This article has complementary materials to the Testing nodejs Applications book. However, the article is designed to help both those who already bought the book, as well as the wide audience of software developers to setup working environment. Testing Nodejs Applications Book Cover You can grab a copy of this book on this link

Installing redis on Linux

It is always a good idea to update the system before start working. There is no exception, even when a daily task updates automatically binaries. That can be achieved on Ubuntu and Aptitude enabled systems as following:

$ apt-get update # Fetch list of available updates
$ apt-get upgrade # Upgrades current packages
$ apt-get dist-upgrade # Installs only new updates

Example: updating aptitude binaries

At this point most of packages should be installed or upgraded. Except Packages whose PPA have been removed or not available in the registry. Installing software can be done by installing binaries, or using Ubuntu package manager.

Installing a redis on Linux using apt

Updating redis – In case the above global update didn't take effect. The -y option passes YES, so there are no prompt for Y/N? while installing libraries.

# Installing binaries 
$ curl -O http://download.redis.io/redis-stable.tar.gz
$ tar xzvf redis-stable.tar.gz && cd redis-stable 
$ make && make install
# Configure redis - for first time installs 

# Install via PPA 
$ apt-get install -y python-software-properties #provides access to add-apt-repository 
$ apt-get install -y software-properties-common python-software-properties

# @link https://packages.ubuntu.com/bionic/redis 
$ add-apt-repository -y ppa:bionic/redis # Alternatively rwky/redis
$ apt-get update
$ apt-get install -y redis-server

# Starting Redis for development on Mac
$ redis-server /usr/local/etc/redis.conf 

Example: installing redis binaries with aptitude

Installing redis on a Mac system

In case homebrew is not already available on your mac, this is how to get one up and running. On its own, homebrew depends on ruby runtime to be available.

homebrew is a package manager and software installation tool that makes most developer tools installation a breeze.

$ /usr/bin/ruby -e "$(curl -fsSL https://raw.githubusercontent.com/Homebrew/install/master/install)"

Example: installation instruction as provided by brew.sh

Generally speaking, this is how to install/uninstall things with brew

$ brew install wget 
$ brew uninstall wget 

Example: installing/uninstalling wget binaries using homebrew

We have to to stress on the fact that Homebrew installs packages to their own directory and then symlinks their files into /usr/local.

It is always a good idea to update the system before start working. And that, even when we have a daily task that automatically updates the system for us. macOS can use homebrew package manager on maintenance matters. To update/upgrade or check outdated packages, following commands would help.

$ brew outdated                   # lists all outdated packages
$ brew cleanup -n                 # visualize the list of things are going to be cleaned up.

$ brew upgrade                    # Upgrades all things on the system
$ brew update                     # Updates all outdated + brew itself
$ brew update <formula>           # Updates one formula

$ brew install <formula@version>    # Installs <formula> at a particular version.
$ brew tap <formular@version>/brew  # Installs <formular> from third party repository

# untap/re-tap a repo when previous installation failed
$ brew untap <formular> && brew tap <formula>   
$ brew services start <formular>@<version>

Example: key commands to work with homebrew cli

For more informations, visit: Homebrew ~ FAQ.

Installing a redis on a macOS using curl

Installing redis via a curl command is not that different as on Linux system. The following instructions can accomplish the installation.

# Installing binaries 
$ curl -O http://download.redis.io/redis-stable.tar.gz
$ tar xzvf redis-stable.tar.gz && cd redis-stable 
$ make && make install
# Configure redis - for first time installs 

Example: install redis binaries using curl and make

Installing a redis on a Mac using homebrew

$ brew install redis        # Installation following <formula>@<version> template 
$ brew services start redis # Starting redis as a service  

# Alternatively start as usual 
$ redis-server /usr/local/etc/redis.conf
# Running on port: 6379

Example: install redis binaries using homebrew

Installing redis on a Windows machine

MacOs comes with Python and Ruby already enabled, these two languages are somehow required to run successfully a nodejs environment. This is an easy target as redis gives windows binaries that we can download and install on a couple of clicks.

Automated upgrades

Before we dive into automatic upgrades, we should consider nuances associated to managing a mongodb instance. The updates fall into two major, quite interesting, categories: patch updates and version upgrades.

Following the SemVer ~ aka Semantic Versioning standard, it is recommended that the only pair minor versions be considered for version upgrades. This is because minor versions, as well as major versions, are subject to introducing breaking changes or incompatibility between two versions. On the other hand, patches do not introduce breaking changes. Those can therefore be automated.

We should highlight that it is always better to upgrade at deployment time. The process is even easier in containerized context. We should also automate only patches, to avoid to miss security patches.

In the context of Linux, we will use the unattended-upgrades package to do the work.

$ apt-get install unattended-upgrades apticron

Example: install unattended-upgrades

Two things to fine-tune to make this solution work are: to enable a blacklist of packages we do not to automatically update, and two, to enable particular packages we would love to update on a periodical basis. That is compiled in the following shell scripts.

Unattended-Upgrade::Allowed-Origins {
//  "${distro_id}:${distro_codename}";
    "${distro_id}:${distro_codename}-security"; # upgrading security patches only 
//   "${distro_id}:${distro_codename}-updates";  
//  "${distro_id}:${distro_codename}-proposed";
//  "${distro_id}:${distro_codename}-backports";
};

Unattended-Upgrade::Package-Blacklist {
    "vim";
};

Example: fine-tune the blacklist and whitelist in /etc/apt/apt.conf.d/50unattended-upgrades

The next step is necessary to make sure unattended-upgrades download, install and cleanups tasks have a default period: once, twice a day or a week.

APT::Periodic::Update-Package-Lists "1";            # Updates package list once a day
APT::Periodic::Download-Upgradeable-Packages "1";   # download upgrade candidates once a day
APT::Periodic::AutocleanInterval "7";               # clean week worth of unused packages once a week
APT::Periodic::Unattended-Upgrade "1";              # install downloaded packages once a day

Example: tuning the tasks parameter /etc/apt/apt.conf.d/20auto-upgrades

This approach works on Linux(Ubuntu), especially deployed in production, but not Windows nor macOS. The last issue, is to be able to report problems when an update fails, so that a human can intervene whenever possible. That is where the second tool apticron in first paragraph intervenes. To make it work, we will specify which email to send messages to, and that will be all.

EMAIL="<email>@<host.tld>"

Example: tuning reporting tasks email parameter /etc/apticron/apticron.conf

Conclusion

In this article we revisited ways to install redis on various platforms. Even though configuration was beyond the scope of this article, we managed to get everyday quick refreshers out.

Reading list

#nodejs #homebrew #UnattendedUpgrades #nvm #n #y2020 #Jan2020 #HowTo #ConfiguringNodejsApplications #tdd #TestingNodejsApplications

This article revisits essentials on how to install a nodejs environment, on both development and production servers.

This article has complementary materials to the Testing nodejs Applications book. However, the article is designed to help both those who already bought the book, as well as the wide audience of software developers to setup working environment. Testing Nodejs Applications Book Cover You can grab a copy of this book on this link

Installing nodejs on Linux

When running aptitude, or similar package management tools, installing nodejs becomes quite like installing any other program. The following commands are the ones most people tend to use.

Installing a nodejs on Linux using apt

Challenge using this strategy, is to make sure we have nodejs in our PPA database.

# Adding and using nodejs from individual PPAs 
$ sudo add-apt-repository ppa:chris-lea/nodejs
$ sudo apt-get update
$ sudo apt-get install -y nodejs


# Removing Chriss Lea PPA before using NodeSource PPA 
# @link https://github.com/nodesource/distributions#manual-installation
$ sudo add-apt-repository -y -r ppa:chris-lea/nodejs
$ sudo rm -f /etc/apt/sources.list.d/chris-lea-node_js-*.list
$ sudo rm -f /etc/apt/sources.list.d/chris-lea-node_js-*.list.save


# Adding and using NodeSource distribution 
# @link https://github.com/nodesource/distributions 
$ curl -sL https://deb.nodesource.com/setup_10.x | sudo -E bash -
# Alternatively 
$ curl -sL https://deb.nodesource.com/setup | sudo bash -
$ sudo apt-get install -y nodejs

Example: install nodejs binaries aptitude

Once we have nodejs to be recognized by aptitude, most operations becomes a little more familiar. Normally running apt-get upgrade should upgrade all binaries including nodejs. We should mention that updating nodejs also updates npm.

Installing a nodejs on Linux using nvm

When we want to test an application against a particular version of nodejs, the environment we work in should be able to manage multiple versions of nodejs. That is where tools such as nvm come into play.

To make the tool work, we will have to have nodejs installed on our work environment. The second step will be to download and install nvm to our work environment. After installation, we can use tools provided by the nvm to install and toggle a specific version.

$ curl https://raw.githubusercontent.com/creationix/nvm/master/install.sh | bash
# Or 
$ wget https://raw.githubusercontent.com/creationix/nvm/master/install.sh | bash
# Install a particular nodejs version
$ nvm install v<Major>.<Minor>.<Patch>
# toggle a particular nodejs version
$ nvm use  v<Major>.<Minor>.<Patch>
# execture code with a particular nodejs version 
$ nvm run  v<Major>.<Minor>.<Patch> /path/to/server.js
# uninstall a particular nodejs version
$ nvm uninstall  v<Major>.<Minor>.<Patch>

Example: working with nvm tool

An approach a bit similar to this is available for yet another nodejs version manager known under pseudonym n

Installing nodejs on macOS

It is possible to download and install nodejs manually, with ready to use installer. However, when wanting to tuning nodejs environment at our taste, messing with methods and other tools described below becomes a must.

In case homebrew is not already available on your mac, this is how to get one up and running. On its own, homebrew depends on ruby runtime to be available.

homebrew is a package manager and software installation tool that makes most developer tools installation on macOS a breeze. We should also highlight that homebrew requires xcode to be available on the system.

$ /usr/bin/ruby -e \
    "$(curl -fsSL https://raw.githubusercontent.com \
    /Homebrew/install/master/install)"

Example: installation instruction as provided by brew.sh

Generally speaking, this is how to install and uninstall things with brew

$ brew install wget 
$ brew uninstall wget 

Example: installing/uninstalling wget binaries using homebrew

We have to to stress on the fact that Homebrew installs packages to their own directory and then symlinks their files into /usr/local.

It is always a good idea to update the system before start working. And that, even when we have a daily task that automatically updates the system for us. macOS can use homebrew package manager on maintenance matters. To update/upgrade or check outdated packages, following commands would help.

$ brew outdated                   # lists all outdated packages
$ brew cleanup -n                 # visualize the list of things are going to be cleaned up.

$ brew upgrade                    # Upgrades all things on the system
$ brew update                     # Updates all outdated + brew itself
$ brew update <formula>           # Updates one formula

$ brew install <formula@version>    # Installs <formula> at a particular version.
$ brew tap <formular@version>/brew  # Installs <formular> from third party repository

# untap/re-tap a repo when previous installation failed
$ brew untap <formular> && brew tap <formula>   
$ brew services start <formular>@<version>

Example: key commands to work with homebrew cli

For more informations, visit: Homebrew ~ FAQ.

Installing a nodejs on a macOS using curl

nodejs installation guide suggests this alternative for the MacOs. However, we have to customize a download directory, the version, and installation directory.

$ curl "https://nodejs.org/dist/latest/node-${VERSION:-$(wget \
    -qO- https://nodejs.org/dist/latest/ | \
    sed -nE 's|.*>node-(.*)\.pkg</a>.*|\1|p')}.pkg" > \
    "$HOME/Downloads/node-latest.pkg" && sudo installer \
    -store -pkg "$HOME/Downloads/node-latest.pkg" -target \
    "/"

Example: installation instruction as provided by nodejs

Using homebrew, as demo-ed in next paragraph, may be the most popular approach to install nodejs version on a macOS machine.

Installing a nodejs on a Mac using homebrew

In case homebrew is not already available on your mac, this is how to get one up and running. On its own, homebrew depends on ruby runtime to be available.

homebrew is a package manager and software installation tool that makes most developer tools installation a breeze.

$ /usr/bin/ruby -e "$(curl -fsSL https://raw.githubusercontent.com/Homebrew/install/master/install)"

Example: installation instruction as provided by brew.sh

In case the homebrew is already available, it is a good practice to update it before adding new software. In the next code sample, we install some tools such as wget, sometimes useful to download binaries.

how to install things with brew

$ brew install nodejs  

Example: install nodejs binaries using homebrew

After installation, add binary to the PATH [ /usr/local/share/npm/bin ], $ nano /etc/paths, append the path /usr/local/share/npm/bin at the end of the file.

homebrew installs packages to their own directory and then symlinks their files into /usr/local.

Installing nodejs on a Windows machine

MacOs and most Linux distributions come with Python and Ruby already enabled. These two languages are somehow required to run successfully a nodejs environment on any server. This is an easy target as nodejs gives windows binaries that we can download and install on a couple of clicks.

Automated upgrades

Before we dive into automatic upgrades, we should consider nuances associated to managing a nodejs instance. The updates fall into two major, quite interesting, categories: patch updates and version upgrades.

Following the SemVer ~ aka Semantic Versioning standard, it is not recommended to consider minor/major versions for automated upgrades. One of the reasons being that these versions are subject to introducing breaking changes or incompatibility between two versions. On the other hand, patches are less susceptible to introduce breaking changes, whence ideal candidates for automated upgrades. Another among other reasons, being that security fixes are released as patches to a minor version.

We should highlight that it is always better to upgrade at deployment time. The process is even easier in containerized context. We should also automate only patches, to avoid to miss security patches.

In the context of Linux, we will use the unattended-upgrades package to do the work.

$ apt-get install unattended-upgrades apticron

Example: install unattended-upgrades

Two things to fine-tune to make this solution work are: to enable a blacklist of packages we do not to automatically update, and two, to enable particular packages we would love to update on a periodical basis. That is compiled in the following shell scripts.

Unattended-Upgrade::Allowed-Origins {
//  "${distro_id}:${distro_codename}";
    "${distro_id}:${distro_codename}-security"; # upgrading security patches only 
//   "${distro_id}:${distro_codename}-updates";  
//  "${distro_id}:${distro_codename}-proposed";
//  "${distro_id}:${distro_codename}-backports";
};

Unattended-Upgrade::Package-Blacklist {
    "vim";
};

Example: fine-tune the blacklist and whitelist in /etc/apt/apt.conf.d/50unattended-upgrades

The next step is necessary to make sure unattended-upgrades download, install and cleanups tasks have a default period: once, twice a day or a week.

APT::Periodic::Update-Package-Lists "1";            # Updates package list once a day
APT::Periodic::Download-Upgradeable-Packages "1";   # download upgrade candidates once a day
APT::Periodic::AutocleanInterval "7";               # clean week worth of unused packages once a week
APT::Periodic::Unattended-Upgrade "1";              # install downloaded packages once a day

Example: tuning the tasks parameter /etc/apt/apt.conf.d/20auto-upgrades

This approach works on Linux(Ubuntu), especially deployed in production, but not Windows nor macOS. The last issue, is to be able to report problems when an update fails, so that a human can intervene whenever possible. That is where the second tool apticron in first paragraph intervenes. To make it work, we will specify which email to send messages to, and that will be all.

EMAIL="<email>@<host.tld>"

Example: tuning reporting tasks email parameter /etc/apticron/apticron.conf

Conclusion

In this article we revisited ways to install nodejs on various platforms. Even though configuration was beyond the scope of this article, we managed to get everyday quick refreshers out.

Reading list

#nodejs #homebrew #UnattendedUpgrades #nvm #n #y2020 #Jan2020 #HowTo #ConfiguringNodejsApplications #tdd #TestingNodejsApplications

Your encryption will need keys


As opposed to other most SSL certificate issuers, Let's encrypt is not only free to use but also easy to install and update. This write-up highlights steps I followed to install mine on both Hoo.gy.

This article has complementary materials to the Testing nodejs Applications book. However, the article is designed to help both those who already bought the book, as well as the wide audience of software developers to setup working environment. Testing Nodejs Applications Book Cover You can grab a copy of this book on this link

The motivation to write this article is threefold. First, this article serves as a reference for future needs, using Let's encrypt. Second, sharing experience with developer community is another form of learning. Third, as a token of appreciation to the team that democratizes this core part of security infrastructure.

This blog was first published under the title: “How to install Let's Encypt SSL certificate on ubuntu and nginx server “ on dev.to and Medium.

In this article you will learn:

  • What are required binaries, and how to install those
  • How to generate required Keys and Certificates
  • How to install certificate(s) on an nginx instance
  • How to enforce HTTS redirection
  • How to automate certificate (Auto-)renewal

Acknowledgments: To my friend and security nerd @jc_uwimpuhwe for proof-reading and idea enrichments.

Install necessary software

Hoo.gy runs on Ubuntu 14 LTS Linux box located at NYC DigitalOcean datacenter. The NodeJS web server is coupled with Nginx. From this perspective, I will suppose your system runs a similar stack.

Certificate Issuance is done via a bot, Certbot, and covers a wide variety of Operating Systems and Web Servers. First, the step was to update and install latest packages, as well as making sure Ubuntu includes a new source of packages.

$ sudo apt-get update
$ sudo apt-get install software-properties-common
$ sudo add-apt-repository ppa:certbot/certbot
$ sudo apt-get update
$ sudo apt-get install python-certbot-nginx 

The second step installs certbot on the box. The following command is good for Nginx server, but more can be found at eff.org.

There are two possible modes to generate SSL certificates. That is going to be the subject of the following section.

Generate Key and Certificate

The default mode is designed for regular Linux users. Everything is taken care of after you run the next command. Certbot generates proper keys+certificate and automatically update Nginx configuration files.

 $ sudo certbot --nginx 

For more advanced users, who rather like they key+certificate, and install certificates as it pleases them, this command will help them:

 $ sudo certbot --nginx certonly

After generating private key and certificate, in addition, you will need to install certificates, re-enforce HTTPS redirection, and to automate certificate renewals.

Install Certificate(s) on Nginx

Since you are already running Nginx in production, chances are you don't want anything to mess with your custom configurations. The second command gives you just that. There are two ways to do install certificates: first is to keep your configurations intact, and symlink new certificates. The second is obviously to change configuration links to a new location. I preferred the latter.

# in /etc/nginx/sites-enabled/[your-config-file]
server{
  ...  
  listen 443 ssl;
  server_name example.com;
  ssl_certificate /etc/letsencrypt/live/example.com/fullchain.pem;
  ssl_certificate_key /etc/letsencrypt/live/example.com/privkey.pem;  
  ...
}

For some reasons, I was accustomed to chained.crt for certificate and key.crt for the keys. The switch is not that difficult though. Certbot generates same files under slightly different names: privatekey.pem for keys, and fullchain.pem for certificates.

Enforce HTTPS redirection

There is a lot of discussions on this topic. Software developers are the worst people to have a discussion with. We always end up in tribalism, and who does it better. One way that made sense in my case, was to create a new server block in existing configuration file and redirect any request to marching this new server block, to a server block that listens only to HTTPS. The new block looks somehow like the following:

server{
 listen 80;
 server_name example.com www.example.com;
 
 # redirect, and rewrite all links to https://example.com 
 return 301 https://example.com$request_uri;
 
 # Alternatively: if you want to forward without rewriting requested URL 
 return 301 https://$server_name$request_uri;
}

Customization of nginx configuration can be a whole new topic on its own, but I cannot close this post without talking about two things: auto-renewal(using a cron job) and redirect all traffic to secure channel.

Automatic renewal

SSL certificates issues by Let's encrypt last for 90 days. Which is not a bad thing on its own. If you have 1000+ servers to update every 90 days, though ... that would be a nightmare. Whence you need some sort of automation. How to go about that, is the last topic in this blog post.

First of all, to renew certificate from Let's Encrypt takes a second ... if everything works according to the plan.

$ sudo certbot renew --dry-run
# or simply:
# $ sudo certbot renew
# restart the nginx server
$ sudo nginx restart 

If you are lucky to have a smaller configuration and used auto-renewal strategy, you may have a cronjob similar to the following:

# file: /etc/cron.d/certbot
0 */12 * * * root test -x /usr/bin/certbot -a \! -d /run/systemd/system && perl -e 'sleep int(rand(3600))' && certbot -q renew

Code snippet from Ishigoya ~ Serverfault

It is possible to customize frequency, and restart command. The cronjob gives you a way to calibrate dates by using this star format: cronjob [minute, hour, the day of the month, month, the day of week].

  • This cron runs every day around 5:30 server time: _30 5 * * * ... _
  • This one runs same time, every bi-monthly(1st and 15th) 30 5 1,15 * * ...
  • This last one runs same time, every two months: 30 5 * */2 *

So your cronjob may end up looking like the following if you wish to renew certificates every day around 5:30 server time.

30 5 * * * certbot renew --post-hook "service nginx restart"
# alternatively: using systemctrl 
# 30 5 * * * certbot renew --post-hook "systemctl reload nginx"

Please consider a donation for this service to service at Let's Encrypt.Even though thoughts discussed in this article seems simple(not to say naive security-wise), there are enhancements done atop Let’s Encrypt foundations, that makes this choice rock solid. If you work in Containers environment, especially Kubernetes, you should check Kelsey Hightower’s Kube Cert Manager project on Github. Netflix’s Lemur is another alternative to manage certificates, you can read an introductory article here.

Reading list

#nginx #ssl #letsencrypt #devops #HowTo #TestingNodejsApplications